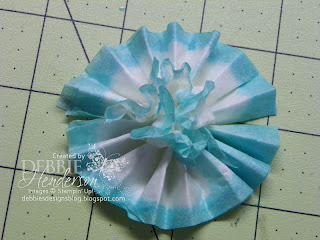
Before I forget, here is the information to purchase the Creped Filter Paper in the Stampin' Up! Catalog:
Item #129393 for $2.95
The look of tissue paper with the strength of card stock. Fun to stamp, dye, ink, punch, or stitch. 12 total sheets: 4 rectangles (ea. 6" x 12") and 8 circles (ea. 6" diam.). White.
Now on to the tutorial.
Step 1:
I used one of my spare stamp storage containers and added Bermuda Bay Ink drops to some water. Add as much as you like. Remember that the ink will dry quite a bit lighter than what you see.
Step 2:
I used one full sheet of the creped paper and cut (4) strips at 2.5" wide and (1) strip 2" wide.
Step 3:
I propped up my stamp case so that the colored water was pooled on one end of my stamp case. Using the Creped Filter Paper, dip the long ends in the colored water. The crepe paper will absorb the water on it's own. Shake off excess colored water.
Step 4:
Using your Heat Tool, dry the ends of your Creped Filter Paper. Don't worry if some of the ink is uneven or if you splashed a little here and there.
Step 5:
Take all 5 pieces and stack them on top of each other. One strip is not as wide as the other 4 so make sure this one sits on top of your pile. Start at one end and fold over about 1/4", flip over and fold in the opposite direction....like an accordion.
Step 6:
Once your Creped Filter Paper is folded accordion style, hold all the folds in place as shown in the photo above.
Step 7:
Using a piece of Baker's Twine, tie your Creped Filter Paper in the center, tightly to secure.
Step 8:
Using both ends of your flower, pull the ends towards each other to form a complete circle. You don't need to glue the ends, they should stay put and once you start crinkling the layers, your flower will remain in a round shape. Grab the first sheet of crepe paper (your short layer), lift and separate and scrunch it up towards the center.
Step 9:
Repeat Step 8 for the 2nd layer. Pushing towards the center.
Step 10:
Repeat Step 8 for all additional layers and work your flower layers until you are happy with the look of your flower. Complete your box:
Stampin' Up! Supplies:
- Inks: Bermuda Bay Ink Refill, Crumb Cake
- Stamps: A Round Array
- Tools: Big Shot Machine, Beautifully Baroque Embossing Folder, 7/8" Scallop Circle Punch, Stampin' Dimensionals, Hexagon Punch
- Cardstock: Crepe Filter Paper, Crumb Cake, Whisper White
- Accessories: Baker's Twine, Tea Lace Paper Doilies, Tag A Bag Bundle
- DSP: Neutrals Paper Pack, Brights Paper Stack,


No comments:
Post a Comment