Friday, February 28

CCC February Cards

As promised... it's the last day of the month so I wanted to share with you all the cards I received from my Crazy Card Club for February... our theme was Babies or Brides with Buttons or Bling.... look at the awesome collection:


Keep those cards and letters comin' in!

Thursday, February 27

OK - so I changed my mind

It's women's prerogative to change her mind right?.... yesterday I told you I preferred silver over gold ... well then look what I found.... ut oh....

All is gold front


Gold Fancy Foil Design Vellum
Gold Foil Sheets
Gold Glimmer Paper
Gold Sequin Trim
Gold Washi Tape
Gold Glimmer Brads
All is golden close

All is gold side

Do you recognize the Tag-a-Bag SU Gift Boxes too..
what an elegant way to decorate.
I'm sure if the box were filled with chocolate then there would 
absolutely be no doubt about it being
 the best gift ever...


Wednesday, February 26

All that Glitters is not Gold...

Although I'm sure those Olympians last week probably would not agree with me, but I personally like silver better than gold....so of course this card caught my eye from Sharon Burkert.... maybe it's the monochromatic black/white look about it that I like too....

Tuesday, February 25

Baby Carriage Safari

Have you ever gone on an African safari??  Not me... but certainly would LOVE to.... hummm.. maybe should add that to my bucket list.... In the mean time, perhaps we could satisfy our safari craving by making a card with all the animals we'd see on safari.... well this one is just darling.... found on Mickey Roberts Paper Conversation blog....She happen to download the animal immages from her Digital Studio but you could use any animal stamp to do the same...

Girlie_Safari_Baby
 
This card begins with a card base of Chocolate Chip cardstock.  A piece of Old Olive cardstock was run through the Big Shot inside the Lattice Textured Impressions embossing folder, the edges sponged with Old Olive ink, matted with a piece of Pumpkin Pie cardstock (the edges sponged with Pumpkin Pie ink), and adhered to the card base to create the card front.

The baby carriage begins with a piece of So Saffron cardstock die cut in the Big Shot using the 3 1/2" circle Originals die then inserted into the Perfect Polka Dots Textured Impressions embossing folder and run through the Big Shot again.  The die cut circle was cut apart into two pieces:  one piece is 1 7/8" wide and the other 1 5/8" wide, then the 1 5/8" wide piece was reduced to 1 3/8" wide.  The edges of both pieces were sponged with So Saffron ink.  A piece of Chantilly Crochet Trim was placed along the straight edge of each piece with a piece of Pumpkin Pie 1/8" Taffeta ribbon placed along the center of the crochet trim.  The top of the carriage was adhered to the card front using Mini Glue Dots and the bottom of the baby carriage was adhered using Stampin' Dimensionals. 

The carriage wheels begin with a piece of So Saffron cardstock punched with the 1 1/4" circle punch and matted with a 1 3/8" circle punched from Chocolate Chip cardstock and adhered to the card front using Stampin' Dimensionals.  The hub for each wheel begins with a piece of Pumpkin Pie cardstock punched with the 1" circle punch, the edges sponged with Pumpkin Pie ink, and spokes scored using the Simply Scored Scoring Tool.  A hole was pierced through the center of the hub and a Very Vanilla Neutrals 5/16" brad was inserted with the brad legs set at the back of the hub.  The hub was adhered at the center of the wheel using Stampin' Dimensionals.

The push handle for the carriage was die cut from Pumpkin Pie cardstock using the Big Shot and the Swirls Medium die and the edges sponged with Pumpkin Pie ink.  Two tags were tied to the die cut with Linen Thread.  The tags were stamped using Pumpkin Pie, Old Olive, and So Saffron inks on Whisper White cardstock, a hole punched at the top of each tag using the 1/16" circle punch, and the tags punched out with the Medium Jewelry Tag punch.  The swirl was adhered to the card front behind the front of the carriage with Mini Glue Dots and the tags were adhered using Stampin' Dimensionals.

The giraffe print was slid into the carriage and adhered to the card front.  A head from a second giraffe was cut out and placed over the head of the adhered giraffe using Stampin' Dimensionals.  The monkey head with hands was cut out and adhere to the card front at the top edge of the carriage bottom using two Stampin' Dimensionals stacked on top of each other.  A second monkey head (this time minus the hands) was placed on top of the first monkey head using Stampin' Dimensionals.

Girlie_Safari_Baby_Inside

The inside sentiment area of the card was lined with a piece of Whisper White cardstock matted with a piece of Pumpkin Pie cardstock.  The palm frond image from the Tropical Party stamp set  was stamped across the bottom edge of the Whisper White cardstock using Old Olive ink.  The tiger and cheetah images cut out and adhered near the bottom edge of the liner.  A second cheetah head was cut out and placed over the adhered cheetah head using Stamping Dimensionals.  Five more palm fronds were stamped on a piece of Whisper White cardstock using Old Olive ink and cut out using Paper Snips.  These palm fronds were adhered along the bottom edge of the liner to create a "jungle" for the cats to peek out from.  

Girlie_Safari_Baby_Envelope_Front

The palm frond image was stamped a few times at the lower left front corner of the Medium Whisper White Envelope.  The zebra image was cut out with Paper Snips and adhered over the palm fronds.  A second zebra head was cut out and placed over the adhered zebra with Stampin' Dimensionals.  (You wouldn't do this if you were mailing this card.)

Girlie_Safari_Baby_Envelope_Back


A monkey was cut out with Paper Snips and added to the back flap of the envelope just for fun.


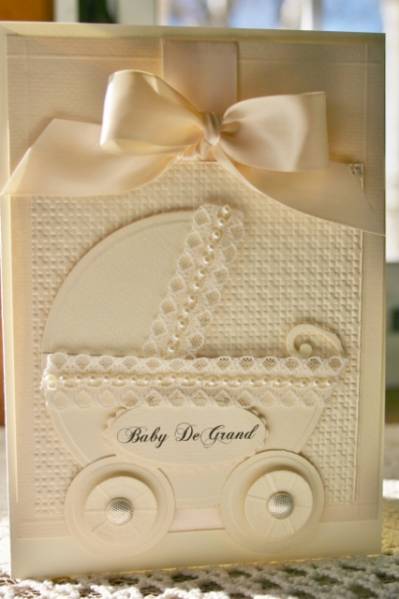
BONUS... here's the baby carriage card that inspired her to create he animal safari card...


Don't ya love it when you see a great idea and how 
differently it can be used to create an entirely new card...
love it love it love it!

Monday, February 24

On a Roll...

So it's a new week... and I'm on a roll... here's another new project that would make an absolutely adorable gift.... especially with Spring right around the corner....

choice-in-box-close.JPG

This one uses JUST the template base as a gift box.
poppy-side.JPG
Now I think THIS alone is FABULOUS.

That is what is SOOOOO great about the gift boxes. 
The IDEA of WHAT kind of gift presentation is entirely up to you... 
go wild and just imagine what would be a great compliment to the box... 
I’m sure your brain gets FLOODED with ideas.

poppy-box-detail.JPG

another-detail.JPG
So here's a great idea in case you didn't think of this one.... 
a dual planter with paper flowers!

choice-set-poppy.JPG

Some of the best inspiration can come from seed packet designs.. 
you could even
tuck the seed packet in with the bouquet!
poppy-in-box.JPG
 Best part is...
 No wilting, no watering!!

Friday, February 21

Still Crazy for Daisys

Remember last week or so I showed you all those adorable card samples of daisys... well.... take a lookie here what I found...a Crazy for Daisy Gift set from Lauren Meader's blog.
daisy-set-front.JPG
You could personalize the container with From the Desk of So-and-So... wouldn't that be sweet? Then you can fill it with cards, stationery, or even use as an organizer for your supplies!

I don’t know why, I just LOVE giving and receiving great cards and gift sets. I love when things are packaged all pretty. It just speaks volumes to the thought and time you put into these gifts. Especially when you take the time to MAKE cards of other items, they deserve to be represented properly!!

Who wouldn’t FREAK if you presented this to them?
daisy-top.JPG
other-side-desk.JPG
 crazy-daisy-set.JPG

This set includes 8 handmade matching cards with envelopes.
Clean and simple-yet nicely detailed.
Also the matching Band-Aid tin is just adorable..
good for holding postage stamps and address labels.
bandaid-tin.JPG
 Also included are three little white notepads decorated with matching
cardstock and ribbon. You can use these to take notes or jot down
addresses and events.

covered-notebook.JPG

Here is the flower detail on the box.
Both flowers are stamped on vellum card stock, 
dry embossed from the back and colored
with varying shades of pink markers. 

daisy-flower-detail.JPG

Just layer the two flowers and add a button center... 
darling ~ simply darling!

Thursday, February 20

*Sweet *Fabulous *Friend

This sweet fabulous card is for the perfect sweet fabulous friend in your life... 


from Chet at Me My Stamps & I

and dedicated to my Sweet and Fabulous kids..
Happy Anniversary David & Holly!
xoxo

Wednesday, February 19

SAB DSP EOM

Found this adorable card packet set on Michelle Surette's blog... could be a darling Mother's Day set or perhaps a great gift for a friend. The box is awesome and the various card designs are just as fantastic... plus bonus money holder / gift certificate holder...

P1050989 P1050995

P1050994

P1050990  P1050993


P1050828 

P1050829

Don't ya just love that new Sale-a-Bration DSP.. 
remember you can't purchase it... 
only way you get it is for FREE with $50 merchandise purchase.... 
SAB only good til end of March... don't delay!
Thus today's title SAB DSP EOM!


Tuesday, February 18

Such Fun!

So the story continues... as I mentioned, I took Brayden up to Claire and Geoff's to spend some time with them as they hadn't see him since summer.....

First thing we walk in the door..
Who can compete with Valentine cupcakes?????


Brayden wanted to show her how well he's 
riding his skateboard bike now too.. 
so was able to get out on their street and buzz up and down several times...  


She also had a huge bottle of bubbles for Brayden...
he was so eager to blow bubbles he 
forget he still had his helmet on!


That took up so much energy that we had to stop and have another cupcake....


Then more bubble blowing in the back yard...
Brayden became Bobby the Bubble Builder!!


We tried getting a family shot but Rio wasn't cooperating too well....
shutter shy I guess.


Then last but not least, and perhaps his favorite 
was swinging in the hammock... 
think he's hooked. 


As we were leaving he said the next time he comes 
he's going to spend ten days with Grandma and ten days with Claire... 
they have this exotic plan all figured out...  
ut oh think I've got some competition!