Tuesday, July 31

Final Four!

As promised.. here's the final four cards from Pam's Stamp-a-Stack last Saturday!


Thanks so much Pam for such a great day... 
it's always a blast to be with you!


Monday, July 30

Playing at Pam's!

Last Saturday spent the day with several of my stampin' buddies! I love it when I get a chance to sit and stamp for a change and that's what I did! Pam had her monthly Stamp-a-Stack and she had some darling cards ready for us to create!
Here's the first batch....


Come back tomorrow and you'll see the final four!!!


Sunday, July 29

Let the Games Begin!!

So I'm sure everyone has been watching the Olympics... such a favorite time of year... er uh... I mean every four years.... wow I loved the Opening Ceremonies on Friday night... It's going to be hard to get ready for my Stamp-a-Stack the next couple weeks cuz now my time will be competing with watching the Olympics!!

So one of the gals at work has a grandson who is turning six next week... and they are having a birthday party for him... of course. And guess the theme... yep... Olympics! How cute is that. They're going to have all kinds of fun games for the kids and some treats that I'm pretty sure most Olympiads wouldn't be eating.. but hey... it's a party!

Anywho, Karlyne asked me if I could make a birthday card for him... with Olympic theme... hummm....

So I came up with this.. pretty simple but cute...well actually this isn't the final card.. this was my first card. I re-did it again cuz it wasn't quite right...


Can you tell what's wrong? (Laura... don't give it away!).....

I didn't take a picture of the final card I gave her....
but I did fill it with extra Olympic rings and circles... 
in case she wanted to use them to decorate but instead
decided they would make cute "confetti" inside the card...
Little Chaz will love it... besides he can't tell what's wrong with it....
hummmm......
ps at least it's not made in China.... oops did I say that out loud???


Saturday, July 28

Pearls Aren't Just White...

All you have to do is grab some Sharpie pens... and voila... you have colored pearls.. and bling too! Here's a great tip I found on Andrea Walford's blog..

You can expand your embellishment options by adding color to Stampin’ Up!’s Basic Pearls and Basic Rhinestones with Sharpie markers – giving you a rainbow of colors to choose from!  You could of course use alcohol based markers like Copic markers or Spectrum Noir markers, but these are significantly more expensive.  Besides, Sharpie markers are readily available at most office supply stores (and they are a non-competitive product for those of you that are SU demos and need to think about these things).


I colored my Basic Pearls with a black Sharpie marker, and then stuck one to each of the “popped” hexagons.  If you’re wondering why I didn’t just use a Staz On pad, I did try, but it didn’t work well – the pad is too big in relation to the pearl, and I couldn’t get around the rounded edges of the pearl.  Besides, Sharpies give you more color options.


What was easy!

Friday, July 27

Tea for Two... or Three or Four...

What an adorable way to display your Tea Bags... makes me wanna host a Tea Party! 

The flower on the top was made from the two step owl punch - but of course what caught my eye was the colors used... my favorites... Soft Suede, Baja Breeze and Crumb Cake!


I found this on Andrea Walford's site.. 
you can subscribe to her Sunny Stampin' Ideas newsletter 
and she will send you these great project ideas every two weeks!

Thursday, July 26

Sizzlin' Summer SAS

It's time for my Sizzlin' Summer Stamp-a-Stack!! Going to be held August 18th here at the Reed Ranch! I'm prepping my ten cards you'll be making if you attend.... and I'm so excited about all the new ideas! Fresh and fun and super simple!!!

Here's a sneak peek at my "circle of flowers"... and got the idea from my monthly Stamp Club that I belong to... actually it was really incredible that I received the same type card from different members from each of the two clubs... now that tells me that it's a popular card... and I just adore it... so I made a variety of colors and styles that you'll get to choose from!


I think it looks like a fun festive garden!!!

Let me know if ya wanna come..

Seating is limited!
Hurry!

Wednesday, July 25

Dedicated to the One I Love

Today would have been my dad's 91st birthday!! ... that is just amazing to me... so I wanted to dedicate this blog to him... take a few minutes to sit with me a spell and share in some of the old time songs he use to love...

BENNY GOODMAN   - Sing Sing Sing (1935)

ROGERS and ASTAIRE - Swing Time (1935)


ANDREWS SISTERS - Boogie Woogie Bugle Boy! (1941)

GLENN MILLER - In the Mood! (1953)


They just don't make 'em like they use to.... 
Dad's that is
xoxoxoxo

Tuesday, July 24

Happy Birthday Claire!!

This is the Day that the Lord has made!!!  

.... and I am so grateful cuz it's the day 
my little sister Claire was born!

Happy Birthday Claire!

You are so very special to me and 
I am eternally grateful to God that he made us sisters...

Have a blast celebrating life!!!


Monday, July 23

A Rose By Any Other Name....

I know I've shown you before some beautiful paper flowers.... well here's a great tutorial by Jilll  Haddad on  how to make paper roses... make with the Ornament Punch. These are waaaaay to big for cards and won't work well in scrapbooks - but they will look beautiful laying around the base of a candle or on the top of a gift box. They are a little time consuming - but well worth the time!


SUPPLIES:
Stampin'Up! Ornament Punch
1 1/4" Circle Punch
Cardstock (Green and Color of your choice)
Sponge Dauber
Classic Ink in Darker Shades of Cardstock Colors
2 Way Glue Pen
Stylus (pencil or screwdriver will work also)
Scoring Instrument

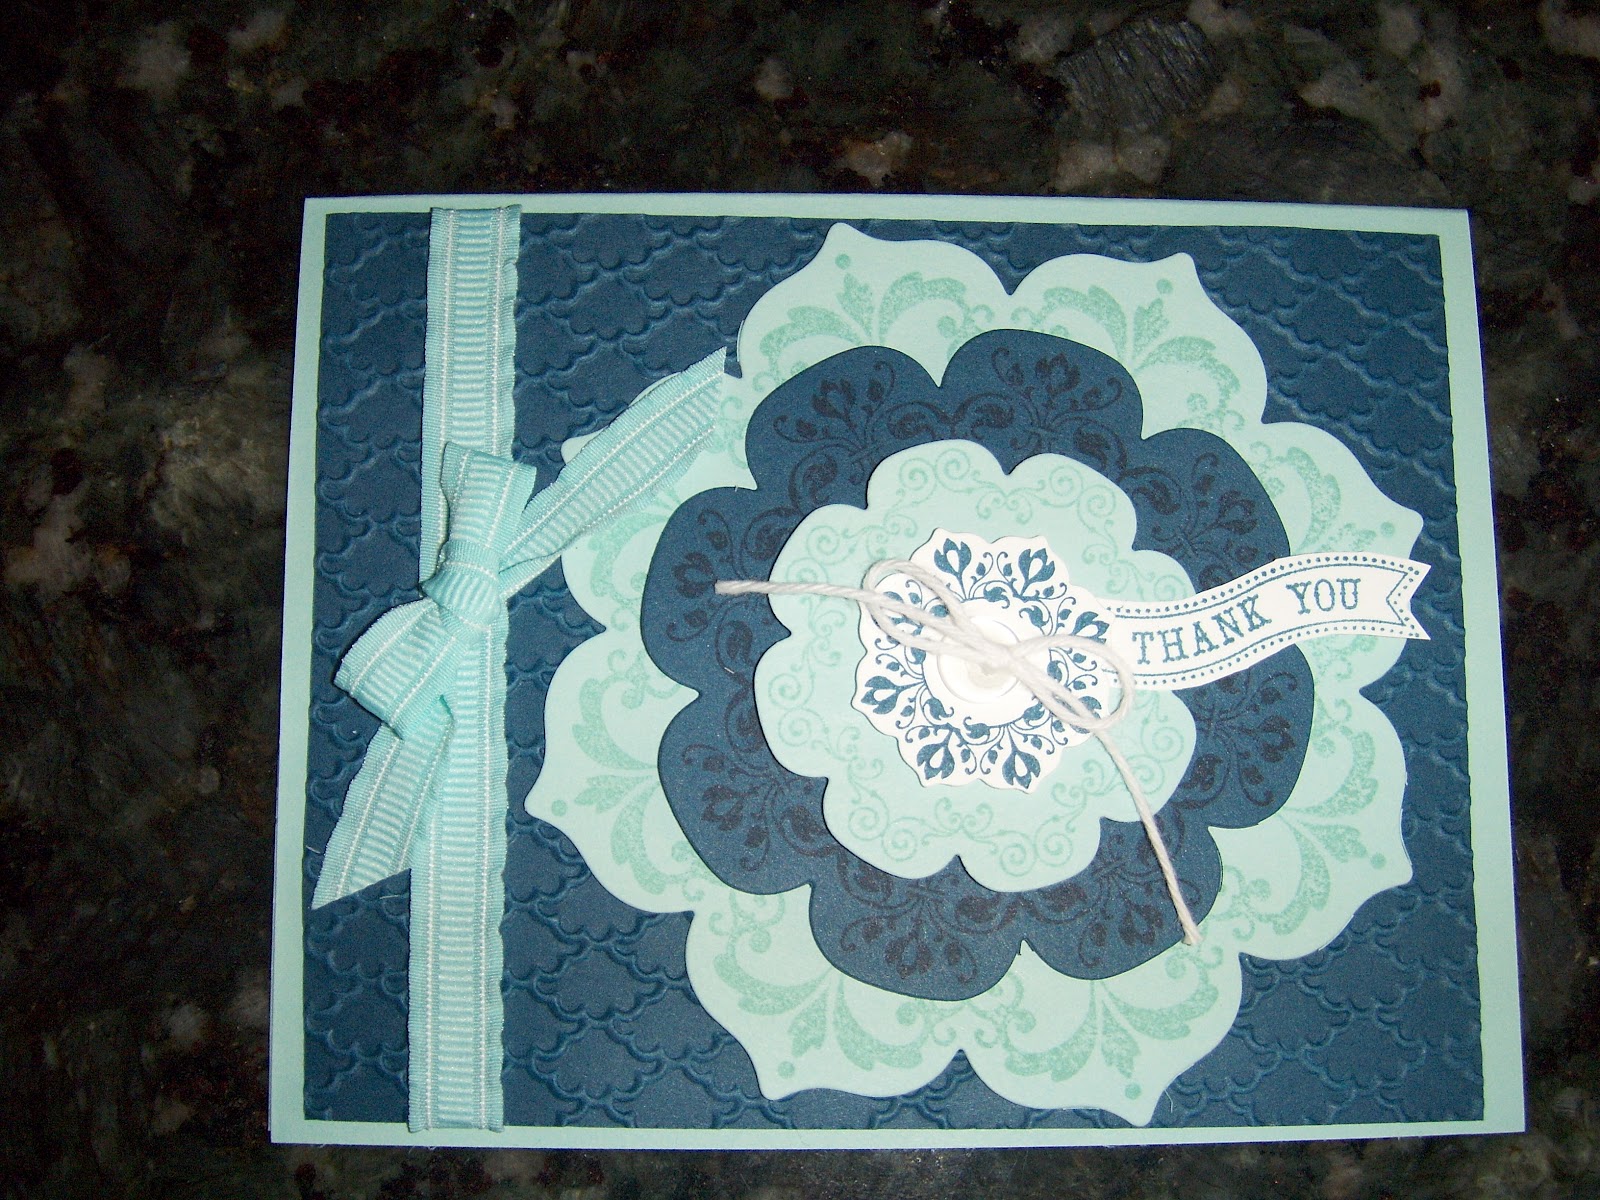
Using the STAMPIN' UP! ORNAMENT PUNCH, punch 18 ornament shapes from your chosen cardstock. Sponge the edges of each petal on both sides. Punch a 1 1/4" circle from matching cardstock. This circle will be your flower base.


Next, use a pencil, stylus or screwdriver to tightly roll the edges of each "petal" from one side to the other. Set each one aside until all are curled.


Begin creating the rose by placing the curled petals around the circle base as shown to the left. I used 7 petals to create this layer for coverage and fullness. I alternated petals - one curled up, the next curled under - overlapping each petal and the petal tab as I worked around the circle.


The second layer was created by using 3 petals , curled inward, glued to the edge of each petal tab on the previous layer. The next time I will use 5 petals in this layer.


The third layer uses 3 petals, all curled inward.


The 4th layer you begin creating the center of the rose. You will use 2 petals. Bend the base tabs at 90 degree angles to the petal and glue the tabs together. Roll the both petals inward creating a cylinder. Apply a small amount of glue as shown on both sides of one petal and hold both petals together with paper clips until dry.


To create the 5th layer - which is the very center of the rose - roll the last ornament shape tightly around the stylus. Add a small amount of glue to the inside edge of the center petal and clip it with a paperclip until dry. Once dry, fold the base tab at a 90 degree angle so that it lays flat across the bottom of the petal. Put a dollop of glue in the center of the rose and put the final petal in place.


To create the leaves, punch 2 or 3 ornament shapes from a green cardstock. Using the stylus and a scoring tool (personal cutter, scorpal, etc) create the veins as shown to the left. Turn the "leaf" over and sponge a darker green ink across the veins and along the edges of the leaves. Glue into place on the back of petals as desired.


And that's it! A beautiful PAPER ROSE.

A Rose by any other name is..... hummm... what???


Sunday, July 22

Lollipop Lollipop... Oh Lolli Lollipop!

Do I have ya singing the ol '50s song about lollipops???

 Now can you name the artist who sang that song in the '50s??

Well here's another version of the lollipop flowers similar to what I made at my last Stamp-a-Stack... this is done by  Connie Babbert.. very cute


Except she went to way more trouble than I did... and used the Floral Frame Framelits and Chevron Folder.


Using the Polka Dot Designer Paper she cut the middle sized and next to smallest flowers from the framelit with the DSP and coordinating cardstock.  Between each of the petals, towards the center, she pierced a hole large enough for the lollipop stick and tucked the lollipop down into it, securing with a few Mini Glue Dots.  Then she scrunched the flowers up around the "bud" of the lollipop.  Next she cut the next to largest flower size with Garden Green cardstock and cut off two of the petals to make leaves.  She ran the leave thru the Big Shot with the Chevron Impressions Folder and adhered to the bottom of the flower with Mini Glue Dots.


Here's the original song... sung by the Chordettes!
Lollipop Lollipop!


Saturday, July 21

Jerry Jerry Quite Contrary!

It's Saturday... and I'm wondering around the backyard... such a gorgeous summer morning! Most often every day I buzz off to work early.... and never really get to tinker around the yard... I miss those days that I use to do that... but really it's my own fault. Generally we say we don't have enough time... honestly it's that we don't TAKE enough time... we all have the same amount of time.... 24 hours in each day, it's just a matter of choice of how we use those 24 hours, right?

Well thankfully Jerry does take the time... the time to keep our yard looking so awesome and enjoyable... and I am so grateful! He loves to garden and work in the patio... he always has a project going or building something or scaring off rabbits... did I say that out loud? Well, anywho... I pulled out my handy dandy little camera and took a few shots on the patio while I enjoyed the Saturday morning sunshine!


Succulents are so popular now...
I think they're great so Jerry's been tenderly growing quite a variety for me!


Allen was "cleaning out" his classroom at school and was going to
throw away this bowl he made cuz it had a nick on it...
glad Jerry grabbed it and created a birdbath out of it!!
love it!


Jerry's favorite... plumeria's blooming so much right now!
And they smell awesome!
We've had this plant for 7-8 years now..
some friends gave it to us when they were moving away
and couldn't take it with them...
we sure lucked out!


love the variety.....


Notice the time... 8:50am....


and notice the temp...


wow.. it's already 70 degrees!
gonna be another warm day in Poway!


very popular spot for bird nests...
we constantly have babies hatching from this one....


....now that's some rolling pin!!!
...and I have no idea where he got that from!


we've had this plant stand since the early '70s...
got it on one of our trips to TJ....
it's been painted and repainted about a gazillion times!


Love the "fish"... Allen made a bunch of these eons ago...


Claire gave this plumeria plant to Jerry last Christmas...
it was just some sticks when we got it....
now look at it... and blooming too!!!


More evidence of Allen's ceramics scattered around the yard....


I couldn't resist getting this darling lazy frog for Jerry...
not that he's lazy... it's that he's getting a well deserved rest after all his hard work!!


.. see the resemblance???

I love you hun!