Sunday, September 30

Button & Brad Containers???

Do you guys have a gob of those clear plastic round button and brad containers sitting around..... like me are you saving them for some brilliant idea to come along where you can use them up? Well wait no longer!.... take a look at this .. and just in time for those little goblins in your life... Penny Smiles put it all together for us!


The Goulish Googlies Designer Kit has great gift bags, tags, baker's twine and googly eyes. I've had fun creating with them and was looking for something new to do with the tags.
Fill it with black jelly beans, candy corn or maybe even spooky little love notes written out on  Scalloped Circles. Now that could be fun!

A peek at the products and then a mini tutorial!
Instructions:
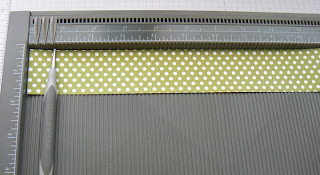
  1. Score DSP, 1-1/2" x 8-1/2", every 1/4" along length as shown.
  2. Fold on each score line, creating valleys and hills or pleats. Adhere ends together using Sticky Strip.
  3. Punch out a circle from Lucky Limeade card stock using the 1-1/2" Circle Punch. Punch out a scalloped circle from Tangerine Tango using the Scalloped Circle Punch.                            
  4. Using the Silicone Craft Sheet (shown above) hot glue the rosette to the Lucky Limeade circle then the  Tangerine Tango Scalloped Circle to the front of the rosette. Adhere the tag using a Stampin' Dimensional.
  5. Stamp a pumpkin using Tangerine Tango ink, onto Whisper White. Cut out using Paper Snips. Adhere to front using Stampin' Dimensionals.

                         
  6. Using a Stampin' Write Marker, ink up only one line of "Candy" and stamp onto Whisper White card stock. Die cut using the Itty Bitty Banners Die. Adhere to card front using a
    Glue Dot.
  7. Stamp EEEK! and a spider web onto Whisper White card stock. Punch out using the Scalloped Circle Punch. Adhere to inside bottom of container using Snail Adhesive.


  8. Cut a strip 7/8" x 8-1/2" of DSP and adhere around base of container using Sticky Strip.


This is dedicated to Terry... there ya go!
Now you have a use for them all!
hee hee hee
(inside joke) 

Saturday, September 29

Paper Conversation

One of the blogs I like to visit is Paper Conversation... Mickey Roberts does a great job of sharing a lot of her projects and clubs she does.... take a look at this darling Christmas tree card.... notice the chevron image stamping she created... how did she get it lined up so perfectly????

Border_Banter_Pennant_Trees
Here's how she did it:  I would love for you to think that I was able to stamp the chevron image side-by-side with enough precision to correctly align all the lines; but that is definitely NOT the case.  The chevron image was stamped five times on Whisper White cardstock using Cherry Cobbler ink and each stamped image cut out with Paper Snips close to the outside edges of each stamped image.  Then the five images were lined up side-by-side, with one image pointing up and the next pointing down, and adhered to a base piece of Whisper White cardstock beginning at the center of the cardstock and moving outward to the left and right edges.  The overhang was trimmed away with Paper Snips to the size of the base piece of Whisper White cardstock.

The base cardstock was adhered to the lower half of a Gumball Green cardstock panel.  A piece of Snow Festival Designer Series Paper was adhered to the top half of the Gumball Green cardstock panel.  Cherry Cobbler Seam Binding ribbon was wrapped around the panel where the Snow Festival and chevron panel meet and knotted on the front of the Gumball Green cardstock panel.  The Gumball Green cardstock panel was adhered to the Cherry Cobbler card front.

The garland tree image from the Pennant Parade stamp set was stamped seven (7) times on a piece of Whisper White cardstock and the trees punched out with the straight side pennant of the Petite Pennants Builder punch.  A single scallop edge pennant was punched from Whisper White cardstock.  The tree stand image from the Pennant Parade stamp set was stamped on a scrap of Whisper White cardstock three times using Early Espresso ink.  The tree stands were cut out with Paper Snips.  A tree stand was adhered on top of the Snow Festival Designer Series Paper just above the ribbon knot and the short edge of the Whisper White scallop pennant adhered atop the tree stand.

Five of the punched garland trees were scored from the tip of the tree to the bottom edge to fold the trees in half.  The trees were then adhered together (right side of one tree to left side of the next).  The outermost left side and outermost right side was adhered at the center of the Whisper White scallop edge pennant.  The remaining two garland trees were adhered to the right and left of the center tree and the remaining tree stands adhered below the left and right trees.  Three stars were punched from Silver Glimmer Paper using the small star punch from the Merry Minis Punch Pack and adhered at the top of each tree using Mini Glue Dots.

Border_Banter_Pennant_Trees_Inside

The inside sentiment area of the card was lined with a piece of Whisper White cardstock.  A strip of Gumball Green cardstock was punched three times using the tree punch from the Merry Minis Punch Pack and adhered along the top edge of the Whisper White cardstock.  The tree images from the Merry Minis stamp set were stamped inside the punched out trees using Gumball Green ink and the Stamp-A-Ma-Jig.  Two of the punched out trees were adhered in the non-punched area of the Gumball Green cardstock using Mini Glue Dots.  The "merry merry merry merry merry" image from the Border Banter stamp set was stamped across the bottom edge of the Whisper White liner using Cherry Cobbler ink and the Stamp-A-Ma-Jig.

A lovely sentiment from the More Merry Messages stamp set was inked using the brush tip of the Cherry Cobbler and Gumball Green Stampin' Write Markers and stamped near the upper center of the liner.

I know... scarrry showing Christmas cards already 
and I'm the one complaining they're already playing 
Christmas music in the stores... oops!


Friday, September 28

Ornament & Gift Box

I pulled this up from an old blog from 2007... Barb Mulkins taught her idea for Christmas Ornament and matching gift box... this never goes out of style!!

It is a clear glass ornament filled with rolled up paper tubes and a box to package it for giving.
Ornamentandboxdashing


Here is the tutorial on the box.
Ornamentboxstampedside_2


This is the box bottom.  I had the Artichoke box bottom put together and then I decided to create a tutorial for it so this is the beginning of the one I did with the Dashing paper.

I decided that I wanted the middle of the box to be a 2 3/4" square and the sides the same size so I cut my Real Red cardstock to 8 1/4 x 8 1/4 (which is 2 3/4 x 3) I scored it at 2 3/4" all the way around.  I cut up the score lines on two opposite sides and stamped the main image from Season of Joy as shown.
Ornamentboxtape


This is a picture of the flip side where I would use Sticky Strip.  Since Sticky Strip is backed with a red strip, I used correction tape so you could see where to place the Sticky Strip.
Finishedbox_2


Here is the box after you remove all the backing pieces from the Sticky Strip and attach it all together.  It is a 2 3/4 square and the ornament will fit neatly inside.
Ornamentlidscored


This is the lid for the box.  It is 4 13/16 x 4 13/16 and scored all the way around at 1".  Cut up the score lines on two opposite sides and add the Sticky Strip.
Ornamentlid


This is the reverse side of the lid showing where to place the Sticky Strip and how I decorated the edges with the swirl from Season of Joy and a 2 5/8 x 2 5/8 square of the Wintergreen papers.
Ornamentandboxwintergreen


Here is the finished project tied with the gold cord.


I thought this was a really cool idea... there are so many great DSP designs you could use for this!

Have fun creating and don't forget to share with me.. 
send me a picture of your finished product 
and I'll feature it on my Blog!!

Thursday, September 27

Time with Tina!

Last Saturday I was fortunate enough to attend Tina's Stamp-a-Stack at her home.... I just love how we all get to share our talents and creativity.. thanks Tina for a wonderful day!

Here's the cards we made....


I love it too how we all think alike...
I'll be teaching the triple layer technique card at my 
October Play Day on the 27th.... 


great minds think alike!


Wednesday, September 26

Jerry's Morning Glories!

Don't think I've shown you guys this really cool bamboo lattice planter Jerry made this summer... then he planted, from seed, some morning glories.. and they've now grown all the way to the top and blossomed too!


I don't think it will take long for it to fill in completely! 
I'll show you the progress in a few more weeks!

Hon, you are my morning glory...
and afternoon glory, and evening glory etc etc etc!!!!
xoxoxoxo


Tuesday, September 25

Play it Again Pam....

Once again Pam, my awesome Downline, had a wonderful September Stamp-a-Sack  the week before last... here are the Fall cards we all got to make....


awesome job Pam!
Love 'em all!


Monday, September 24

Happy Birthday Caleb!!!

Today is Caleb's 20th Birthday.. .wow.... 
no longer a "teenager" !!!... 

Happy 
Birthday 
Caleb! 


You are such a blessing in our lives and wanted to 
wish you the very happiest day ever!

... oh and have a blast at the Theater!
... check it out here


Sunday, September 23

Addicted 2 Decorating

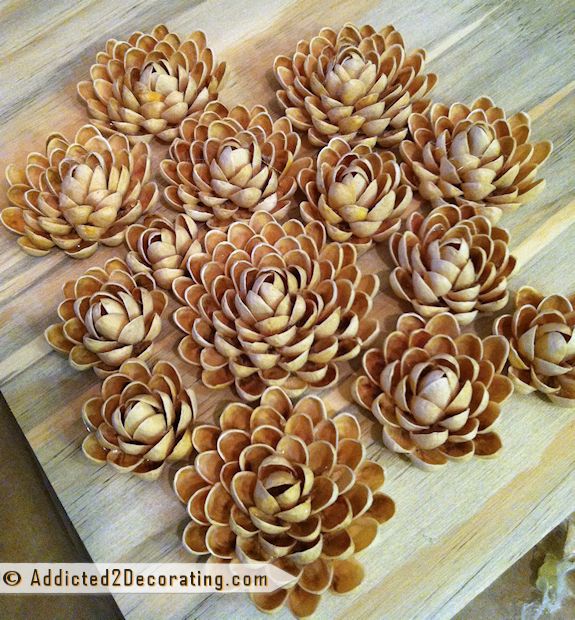
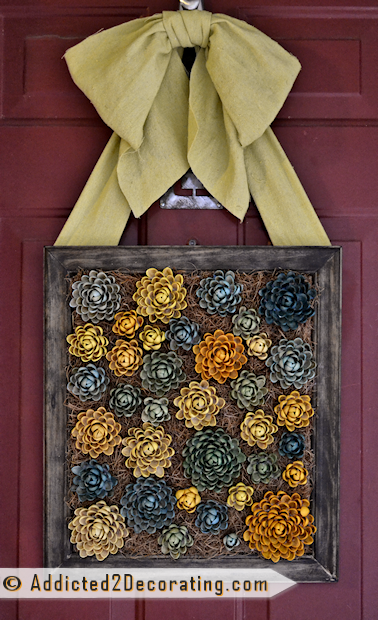
Wow... I found this cool website that has awesome decorating ideas!!!  And check this out.... a hanging "Succulent Garden" made with pistachio shells... you'll go nuts (pardon the pun!)....
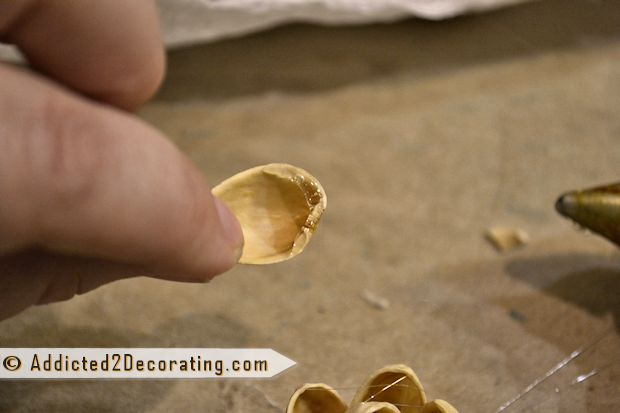

If you make one this big, you’ll need lots and lots of pistachio shells. 
 This is made with the shells from five or six 8-ounce bags of pistachios.

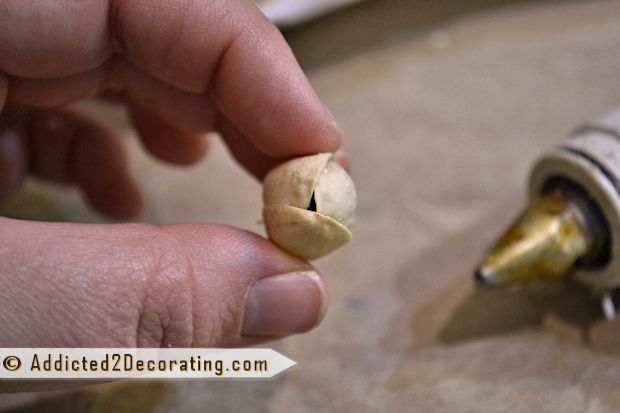
To make the flowers, start with three shells and glue them 
together with your hot glue gun like this…


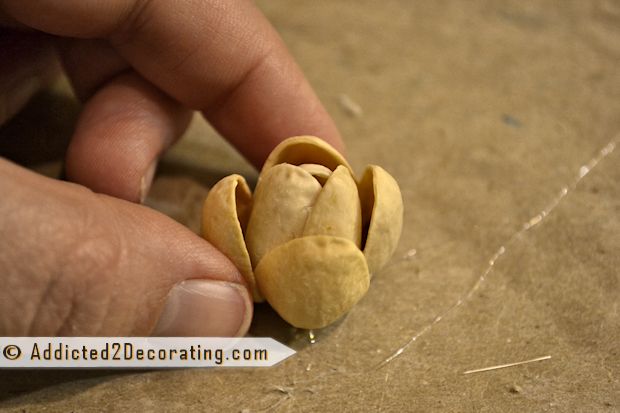
Now you’re going to start adding shells and 
building out by gluing shells  directly to that.  
Just add hot glue around the bottom edge of the shell as shown here.


And then glue them to the first piece you made.


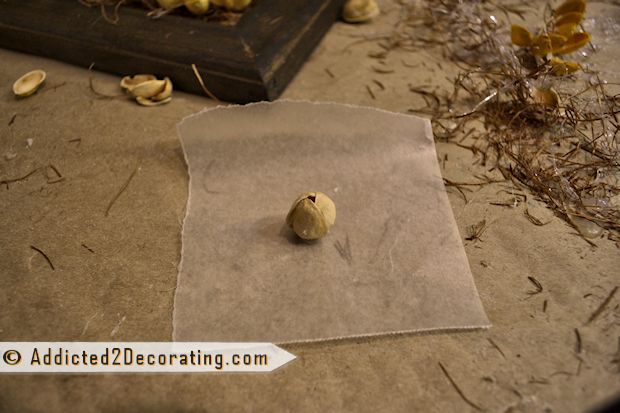
And basically, you just keep adding and building outward until you have a flower that is the size you want it.  So you’re not gluing the shells to a base of any kind.  You’re gluing the shells to each other.After making several flowers, I finally realized that it was easier to make the middle section, and then add a dot of glue to the bottom and attach it to a piece of wax paper.


Then build the flower by turning the wax paper.  This keeps your work surface clear of any hot glue drips, 
and keeps your flower from sticking to your work surface.  When the flower is complete, just rip off the wax paper from the bottom.

Your finished flower will look something like this…


Make as many as you need to fill up your “canvas”.  I just used a piece of 1/4″ plywood for my “canvas”, and mine ended up being about 15″ x 17″.  Of course, it takes FOREVER to make that many flowers, so just be aware of that.  This is a good project to spread out over a few days, and just make a couple of flowers each night while you watch your favorite show on TV.  


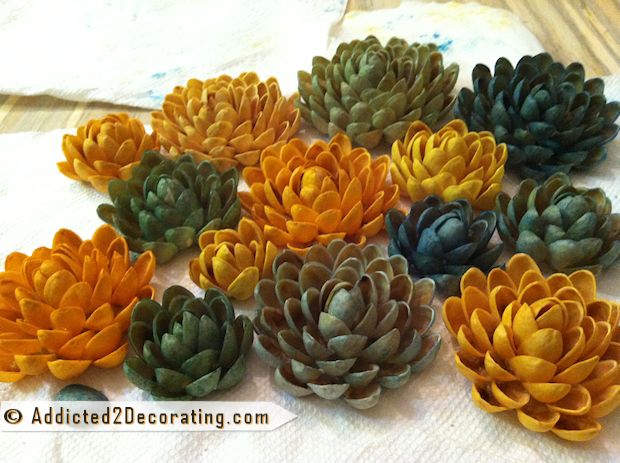
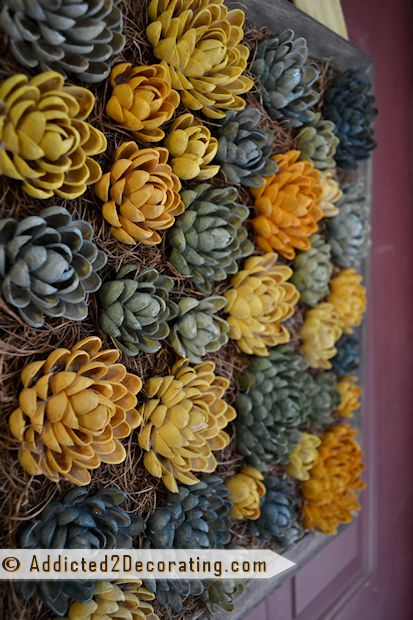
When all of your flowers are made and the glue is completely cooled, the flowers are ready for their dye bath.  I used powdered Rit fabric dye in four different colors, and I left the flowers in at varying lengths of time.  Obviously, the longer you leave them in, the more saturated the color.  I did have a couple of shells detach during their bath, but that didn’t happen much.  My flowers stayed pretty well intact during their dye bath.

My flowers that are very light in color were left in about 30 seconds, and then turned upside down on paper towels for about 20 seconds, and then turned over (right side up) and misted with a spray bottle filled with water.  The ones that are more saturated were left in the dye bath for about three to five minutes, and then placed upside down on a paper towel for the excess to drip off, but I didn’t mist those with water since I didn’t want the color to get diluted.

You can see the difference in this picture below.  The flower on the top row on the right is dyed with the same teal dye as the flower on the bottom row second from the right.  The difference was the amount of time, and the water misting that the light one got after its dye bath.


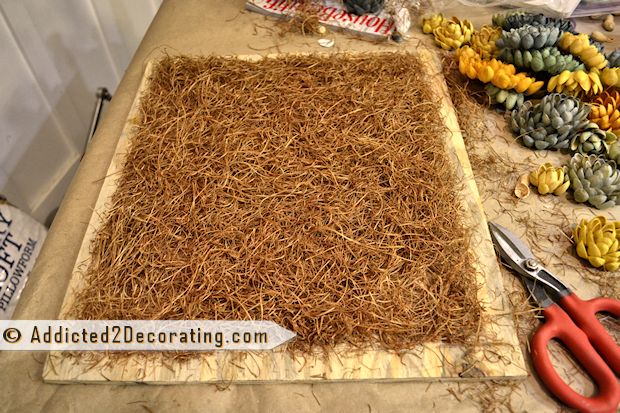
With all of your flowers finished, prepare your “canvas” by gluing the backing of your choice.  I used this light brown moss stuff that I got from Michael’s.  Be sure to leave the edges free since those will fit into your frame.

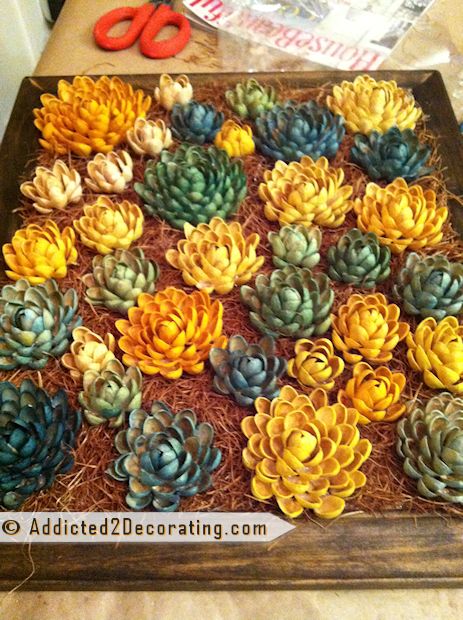
Now go ahead and put the frame on (I just made a very simple frame from moulding I found at Home Depot, and then stained it with Minwax Dark Walnut stain), and begin arranging your flowers.


As you do this, you might find that there are holes that need to be filled.  I ended up having to make four additional small flowers (in the top left corner) to fill empty space.


Then you’re ready to hang your garden.  Because I wanted to hang mine on the front door like a wreath, and because I love big loopy, saggy bows, I cut strips from an extra canvas drop cloth, and dyed it with some of the leftover yellow dye that I had used for the flowers.


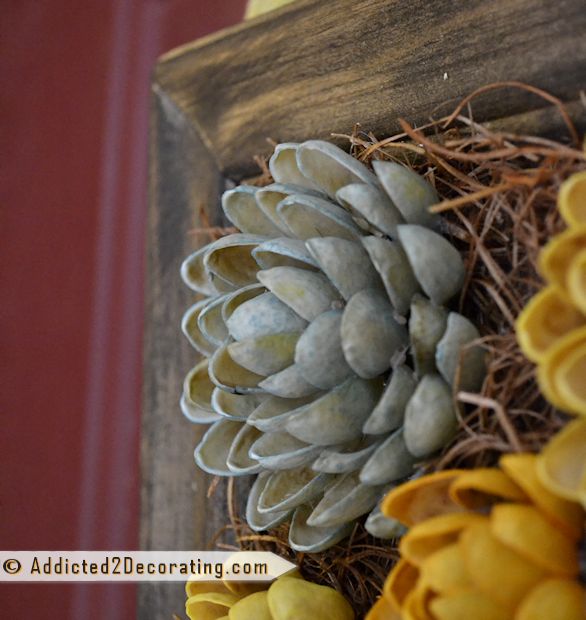
I just love these little flowers.  At a glance, they really do look like they could be real succulents (which I realize aren’t flowers)…until you realize that these succulents don’t come in bright orange, teal, and yellow.    And my green is even off.  But that’s okay.


This one is my absolute favorite.  It got a bath in the teal dye for about 30 seconds, and then got a pretty good shower with the spray bottle.  I love the subtle aqua color.


I’m very pleased with how my little “succulent garden” turned out.  
The best thing is that you won’t be able to kill this one!!  
That’s the best kind of garden ever!